proxy库的使用请参考Proxy库的使用
本文聚焦proxy库的实现分析,分析了convention的实现。
首先,我们从以下例子来看看proxy的convention的用法:
1
2
3
4
5
6
7
8
9
10
11
12
13
14
15
16
17
18
19
20
21
22
23
|
PRO_DEF_MEM_DISPATCH(MemAt, at);
struct Dictionary : pro::facade_builder
::add_convention<MemAt, std::string(int)>
::build {};
void PrintDictionary(pro::proxy<Dictionary> dictionary) {
std::cout << dictionary->at(1) << "\n";
}
int main() {
static std::map<int, std::string> container1{ {1, "hello"} };
auto container2 = std::make_shared<std::vector<const char*>>();
container2->push_back("hello");
container2->push_back("world");
PrintDictionary(&container1);
PrintDictionary(container2);
return 0;
}
|
我们需要解决的问题就是,为什么pro::proxy<Dictionary>可以使用->at间接访问到std::map<int, std::string>的at方法。
手写一个Convention
为了简便,convention称为“约定”。和rust的trait差不多,可以认为就是对于含有方法的一个约定。
为了加深对于proxy库的理解,我们先思考一下,如果手动写,不考虑静态注册之类的信息,我们应该怎么手动定义一个convention?其实看起来是很简单的:
1
2
3
4
5
6
7
8
9
10
11
12
13
| struct MemAtConvention {
template<typename T>
MemAtConvention(T* ptr) {
mPtr = (void*)ptr;
}
std::string at(int idx) {
return (T*)mPtr->at(idx);
}
void *mPtr;
}
|
此时遇到一个问题,是因为我们无法确定MemAtConvention要如何在at方法的时候将mPtr转换成正确的类型。因为c++肯定是没法将类型保存成一个成员变量的。不过没关系,我们可以稍微绕一下:
1
2
3
4
5
6
7
8
9
10
11
12
13
14
15
16
17
| struct MemAtConvention {
template<typename T>
MemAtConvention(T* ptr) {
mPtr = (void*)ptr;
mAccessor = [this](int idx) {
return (T*)mPtr->at(idx);
}
}
std::string at(int idx) {
return mAccessor(idx);
}
void *mPtr;
std::function<std::string(int)> mAccessor;
}
|
这就是类型擦除的一个做法了,使用lambda保存信息。在实际的使用中,我们也可以使用函数模板的方式来擦除T的信息,这样更省资源。
在知道了手写要怎么做的时候,我们就明白proxy库需要解决的几个问题:
- 自动为目标类添加特定的方法,例如
std::string at(int)
- 处理从模板类型
T向特定convention转换的问题(直接存void*指针就是个方法)
- 做好类型擦除,使得能够正确地调用到对应的方法
接下来,我们分别看看proxy库是怎么处理这些问题的。为了专注我们要研究的问题,请注意以下几点:
- 隐藏了所有c++20有关的concept,即requires部分,只专注模板的实现
- 和复制、引用相关的修饰符(例如&&, &)的处理,以及noexcept之类的修饰符处理都不考虑(因为比较简单)
本文的目标最终是找到这两点之间经过的路径:

给proxy自动添加at方法
在这一节中,我们首先需要搞明白为何pro::proxy<Dictonary>会被自动添加上一个at方法,即这张图的前半部分:
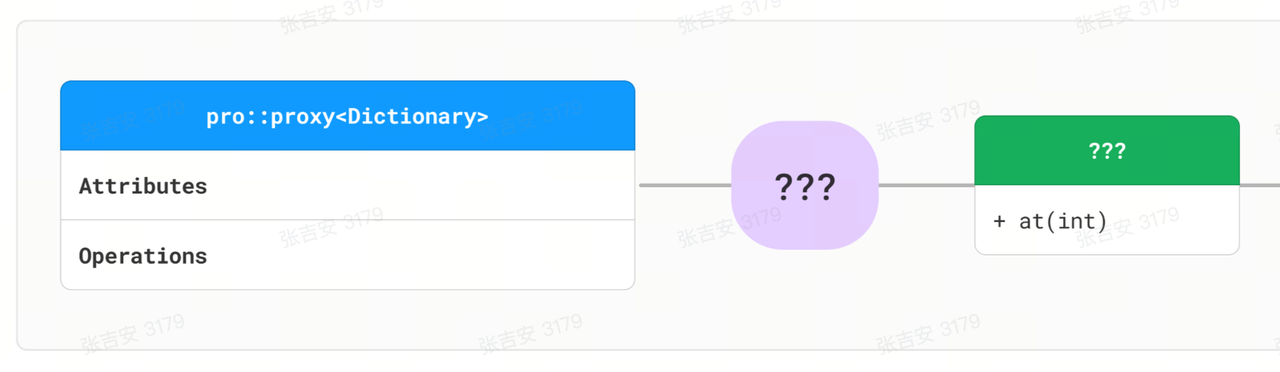
在一切开始之前,先理清proxy中一些概念的定义
MemAt是一个convention,它代表一种约定,MemAt这个约定是类包含at方法(但是形参和返回值未知)Dictionary是一个trait,它是一组convention的集合,并且会规定convention的形参。在当前场景下,Dictionary只有一个convention,就是包含一个std::string at(int)方法=pro::proxy<Dictionary>是一个proxy,它用一个trait作为模板参数,是proxy库中实现间接方法调用的基础,也是数据或者引用的存储对象。
以上三个对象,只有proxy最终会得到实例化,生成一个对象。
如果想快速了解,可以看看官方的sample里的access_proxy.cpp,能大致了解到都具体经历了哪些元编程阶段。
声明一个convention
如下所示,意思是声明一个名为MemAt的convention,包含一个名为at的方法。请注意,这里at是没有具体的类型的:
1
| PRO_DEF_MEM_DISPATCH(MemAt, at);
|
宏展开之后会变成如下的代码:
1
2
3
4
5
6
7
8
9
10
11
12
13
14
15
16
17
18
19
20
21
22
23
24
25
26
27
28
29
30
31
| struct MemAt {
template<class __T, class... __Args>
decltype(auto) operator()(__T &&__self, __Args &&...__args) noexcept(noexcept(::std::forward<__T>(__self).at(::std::forward<__Args>(__args)...)))
{
return ::std::forward<__T>(__self).at(::std::forward<__Args>(__args)...);
}
template<class __F, class __C, class... __Os>
struct __declspec(empty_bases) accessor {
accessor() = delete;
};
template<class __F, class __C, class... __Os>
requires(sizeof...(__Os) > 1u && (::std::is_trivial_v<accessor<__F, __C, __Os>> && ...))
struct accessor<__F, __C, __Os...> : accessor<__F, __C, __Os>... {
using accessor<__F, __C, __Os>::at...;
};
template<class __F, class __C, class __R, class... __Args>
struct accessor<__F, __C, __R(__Args...)> {
__R at(__Args... __args) {
return ::pro::proxy_invoke<__C>(::pro::access_proxy<__F>(*this), ::std::forward<__Args>(__args)...);
}
};
}
|
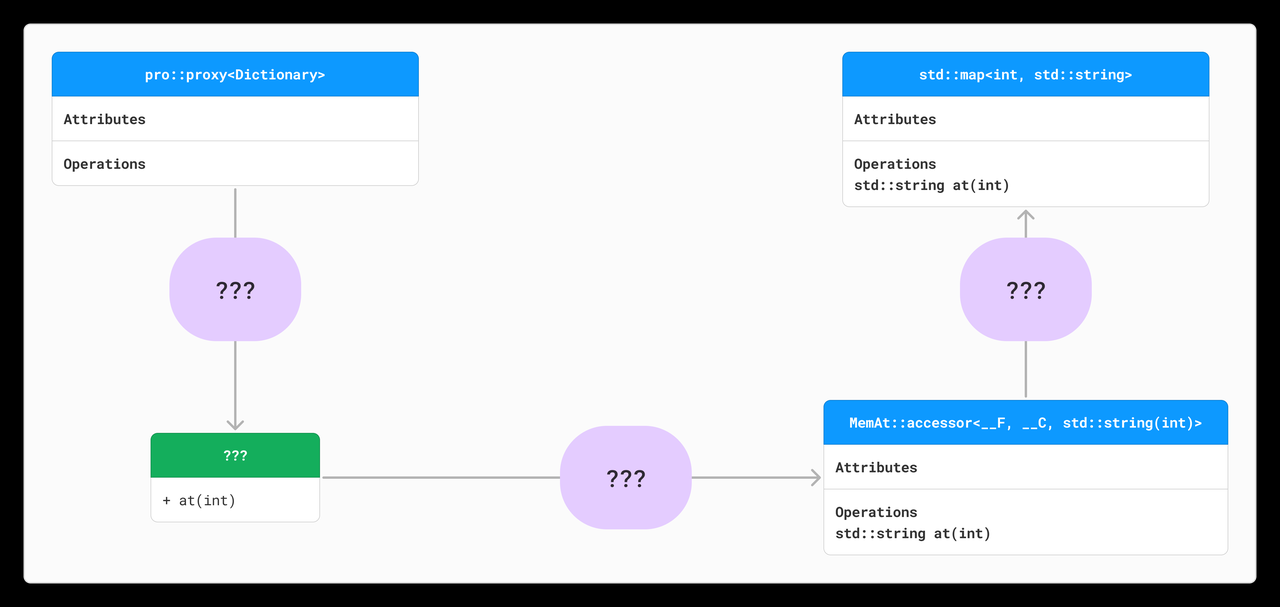
因此我们知道,MemAt是一个具体的类型,但是MemAt::accessor是一个模板类,后续我们可以为MemAt::accessor指定模板参数。进一步展开之前,我们可以先看下这段代码对比,先有个最基础的概念,dictionary->at(1)是怎么和std::map<int, std::string>.at(1)关联上的:
1
2
3
4
5
6
7
8
9
10
11
12
|
template<class __F, class __C, class __R, class... __Args>
struct accessor<__F, __C, __R(__Args...)> {
__R at(__Args... __args) {
return ::pro::proxy_invoke<__C>(::pro::access_proxy<__F>(*this), ::std::forward<__Args>(__args)...);
}
};
struct Dictionary : pro::facade_builder
::add_convention<MemAt, std::string(int)>
::build {};
|
可以对照,这里的__R和__Args对应的就是std::string(int)。最终,我们在dictionary->at(1)调用的其实是MemAt::accessor<__F, __C, std::string(int)>::at。
因此我们的图可以补全成:
添加一个convention到trait
这里我们要明确Dictionary继承的是
pro::facade_builder::add_convention<MemAt, std::string(int)>::build这个类型。
如果没耐心看这一节的分析,先上结论:Dictionary的类型简略结构如下所示:

化简一下就是如下形式(因为是继承)
1
| Dictionary::convention_types = std::tuple<conv_impl<false, MemAt, std::string(int)>>
|
正式开始分析,首先看看pro::facade_builder:
1
2
3
4
5
6
7
8
9
10
11
12
| using facade_builder = basic_facade_builder<std::tuple<>, std::tuple<>,
proxiable_ptr_constraints{
.max_size = details::invalid_size,
.max_align = details::invalid_size,
.copyability = details::invalid_cl,
.relocatability = details::invalid_cl,
.destructibility = details::invalid_cl}>;
template <class Cs, class Rs, proxiable_ptr_constraints C>
struct basic_facade_builder {
}
|
这里很显然facade_builder是一个空实现,这里basic_facade_builder的模板参数Cs代表了convention的列表,RS是反射的列表,C是约束。这里我们先只聚焦Cs。如前所述,第一步里,Cs是一个std::tuple<>,即空列表。
basic_facade_builder是组织所有convention的重要数据结构。
再来看看第二步::add_convention<MemAt, std::string(int)>,展开定义如下所示:
1
2
3
4
5
6
7
8
9
10
|
template <class D, class... Os>
using add_convention = add_indirect_convention<D, Os...>;
template <class D, class... Os>
using add_indirect_convention = basic_facade_builder<details::add_conv_t<
Cs, details::conv_impl<false, D, Os...>>, Rs, C>;
|
这里的D就是MemAt,...Os就是std::string(int)。可以看到,add_indirect_convention又变成了basic_facade_builder,只是Cs部分有所变化了。将元编程转换为伪代码执行,直观地看是这样:
1
2
3
4
5
6
|
pro::facade_builder = basic_facade_builder<std::tuple<>, std::tuple<>, C>;
auto tuple = std::tuple<details::conv_impl<false, MemAt, std::string(int)>>;
auto new_type = basic_facade_builder<{details::conv_impl<false, MemAt, std::string(int)>}, std::tuple<>, C>;
|
因此,add_convention调用过后,当前的类型从basic_facade_builder<std::tuple<>, std::tuple<>, C>变化为了basic_facade_builder<std::tuple<Cs1>, std::tuple<>, C>。新增加了一个convention。
这里假设Cs1=details::conv_impl<false, MemAt, std::string(int)>
如果再调用一次add_convention增加convention,那么类型就会变化成basic_facade_builder<std::tuple<Cs1, Cs2>, std::tuple<>, C>。
之后我们再查看details::conv_impl的实现,请注意conv_impl::accessor的实现:
1
2
3
4
5
6
7
8
9
| template <bool IS_DIRECT, class D, class... Os>
struct conv_impl {
static constexpr bool is_direct = IS_DIRECT;
using dispatch_type = D;
using overload_types = std::tuple<Os...>;
template <class F>
using accessor = typename D::template accessor<F, conv_impl, Os...>;
};
|
IS_DIRECT是访问接口的方式,就是p->at(1)和p.at(1)的区别,在我们的case里这个是false,即间接调用(指针类型的就叫间接调用)。D是MemAt,...Os是std::string(int)。整体结构很简单,回忆一下一开始的宏:
1
2
3
4
5
6
7
8
|
template<class __F, class __C, class __R, class... __Args>
struct accessor<__F, __C, __R(__Args...)> {
__R at(__Args... __args) {
return ::pro::proxy_invoke<__C>(::pro::access_proxy<__F>(*this), ::std::forward<__Args>(__args)...);
}
};
|
来到了这里,at方法就被偏特化了:
1
2
3
| template <class F>
conv_impl<false, MemAt, std::string, int>::accessor
= MemAt::accessor<F, conv_impl, std::string(int)>;
|
最后看一下::build的实现:
1
2
3
4
5
6
7
8
9
10
| using build = details::facade_impl<Cs, Rs, details::normalize(C)>;
template <class Cs, class Rs, proxiable_ptr_constraints C>
struct facade_impl {
using convention_types = Cs;
using reflection_types = Rs;
static constexpr proxiable_ptr_constraints constraints = C;
};
|
这一步比较简单,就是将convention列表存到convention_types中。此外,通过details::normalize合并一些meta信息(目前暂时不重要):
1
2
3
4
| constraints.max_size 就是proxy里存储对象的最大长度,一般情况下就是2 * sizeof(void*)=16
constraints.copyability 复制构造函数的属性(nontrivial, nothrow...)
constraints.relocatability 移动构造函数的属性(nontrivial, nothrow...)
constraints.destructibility 析构函数的属性(nontrivial, nothrow...)
|
因此对于这份代码,我们可以做一个简单的展开:
1
2
3
4
5
6
7
8
|
using Cs = conv_impl<false,MemAt, std::string(int)>;
struct Dictionary : pro::facade_builder
::add_convention<MemAt, std::string(int)>
::build {};
struct Dictionary : details::facade_impl<std::tuple<Cs>, std::tuple<>, C>
|
绕了一大圈,其实就是为了编译期时组装Dictionary::convention_types成为std::tuple<conv_impl<false, MemAt, std::string(int)>>。
如果你调用多组add_convention,最终Dictionary::convention_types会变成一个很长的std::tuple。这里tuple类似运行期的std::vector,包含了我们添加的所有convention信息,只不过是以元编程的方式。
每添加一个convention,Dictionary的类型都是变化的。
将trait和proxy绑定在一起
Dictionary只是一个类型,只是通过元编程的方法增加了一些方法,为了能够正常地调用到对应方法和管理值的生命周期,需要额外声明一个proxy类,我们希望知道最终proxy<Dictionary>是什么样的,为什么能够调用at方法。
直接上结论,proxy<Dictionary>是通过内部的成员获得at方法的:
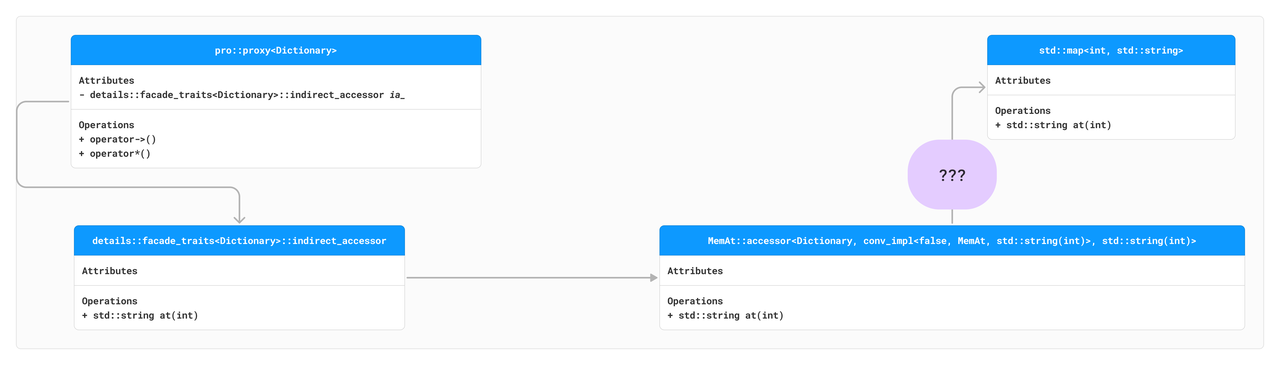
展开看看pro::proxy的实现,主要就是关注两个operator重载,以及成员变量_ia。
1
2
3
4
5
6
7
8
9
|
template <class F>
class proxy : public details::facade_traits<F>::direct_accessor {
auto operator->() { return std::addressof(ia_); }
auto& operator*() & { return ia_; }
using _Traits = details::facade_traits<F>;
typename _Traits::indirect_accessor ia_;
}
|
这里我们通过proxy重载了->和*运算符可以发现,实际上proxy->at(1)调用的是ia_.at(1),这是智能指针里的常用操作了。接下来我们要搞清楚ia_是如何继承到at方法的。
再展开一下_Traits= details::facade_traits<Dictionary>:
1
2
3
4
| template <class F = Dictionary>
struct facade_traits: instantiated_t<facade_conv_traits_impl, typename Dictionary::convention_types, Dictionary> {
}
|
先搞明白instantiated_t的作用,看看details::facade_traits<Dictionary>继承了什么,假设有如下代码:
1
2
3
4
| template<class... Types>
struct MyTemplate {};
using MyTuple = std::tuple<int, double, char>;
|
使用的结果就是如下效果,相当于把第一个参数当做模板类(MyTemplate),第三个参数(float)作为第一个模板参数,第二个参数一定是一个tuple(MyTuple),把tuple的参数展开作为剩余的模板参数
1
2
| using Result = instantiated_t<MyTemplate, MyTuple, float>;
|
之前我们的推导中得到了Dictionary::convention_types=std::tuple<conv_impl<false, MemAt, std::string(int)>>(参考上一节高亮部分),因此代入一下可以得到:
1
2
3
| struct facade_traits : public facade_conv_traits_impl<Dictionary, conv_impl<false, MemAt, std::string(int)>> {
}
|
进一步看看facade_conv_traits_impl<Dictionary, conv_impl<false, MemAt, std::string(int)>>都做了啥:
1
2
3
4
5
6
7
8
9
10
11
| template <class F, class... Cs>
struct facade_conv_traits_impl<F, Cs...> : applicable_traits {
using conv_meta = composite_meta<typename conv_traits<Cs>::meta...>;
using indirect_accessor = composite_accessor<false, F, Cs...>;
using direct_accessor = composite_accessor<true, F, Cs...>;
template <class P>
static constexpr bool conv_applicable_ptr =
(conv_traits<Cs>::template applicable_ptr<P> && ...);
};
|
把F=Dictionary, Cs=conv_impl<false, MemAt, std::string(int)>代入进去,我们得到了ia_的类型:
1
2
3
4
5
6
| typename _Traits::indirect_accessor ia_;
using _Traits = details::facade_traits<Dictionary>;
using details::facade_traits<Dictionary>::indirect_accessor
= composite_accessor<false, Dictionary, conv_impl<false, MemAt, std::string(int)>;
|
很显然,重点就在于composite_accessor的实现:
1
2
3
4
| template <bool IS_DIRECT, class F, class... Cs>
using composite_accessor = recursive_reduction_t<
composite_accessor_helper<IS_DIRECT, F>::template reduction_t,
composite_accessor_impl<>, Cs...>;
|
和之前的basic_facade_builder定义十分相似,但凡看到composite_accessor_impl<>这类的,就知道目的就是要将composite_accessor_impl<>扩充成composite_accessor_impl<A, B, C...>。
首先对于recursive_reduction_t,功能是将recursive_reduction_t<R, O, A, B, C>翻译成
R<R<R<O, A>, B, C>。
展开之后可以得到ia_的类型
1
2
| composite_accessor_helper<false, Dictionary>::
reduction_t<composite_accessor_impl<>, conv_impl<false, MemAt, std::string(int)>>;
|
其次来看composite_accessor_helper,这里的重点在于composite_accessor_reduction的展开:
1
2
3
4
5
6
7
8
9
10
11
12
13
14
15
16
17
18
19
20
|
template <bool IS_DIRECT, class F>
struct composite_accessor_helper {
template <class C> requires(C::is_direct == IS_DIRECT)
using single_accessor = typename C::template accessor<F>;
template <class O, class I>
using reduction_t =
typename composite_accessor_reduction<single_accessor, O, I>::type;
};
template <template <class> class TA, class... As, class I>
struct composite_accessor_reduction<TA, composite_accessor_impl<As...>, I>
{ using type = composite_accessor_impl<As..., TA<I>>; };
|
这里分两步展开,先处理single_accessor的定义:
1
2
3
4
| single_accessor<conv_impl<false, MemAt, std::string(int)>><Dictionary>
= conv_impl<false, MemAt, std::string(int)>::accessor<Dictionary>
= MemAt::accessor<F, conv_impl, std::string(int)><Dictionary>
= MemAt::accessor<Dictionary, conv_impl, std::string(int)>
|
之后得到composite_accessor_helper<false,Dictionary>::reduction_t:
1
2
3
4
5
|
using CONV_IMPL = conv_impl<false, MemAt, std::string(int)>
reduction_t = composite_accessor_impl<MemAt::accessor<Dictionary, CONV_IMPL, std::string(int)>>
|
再展开composite_accessor_impl就能发现最终的结构了:
1
2
3
4
5
6
7
8
9
10
11
12
13
14
| template <class... As>
class composite_accessor_impl : public As... {
template <class> friend class pro::proxy;
composite_accessor_impl() noexcept = default;
composite_accessor_impl(const composite_accessor_impl&) noexcept = default;
composite_accessor_impl& operator=(const composite_accessor_impl&) noexcept
= default;
};
class composite_accessor_impl :
public MemAt::accessor<Dictionary, CONV_IMPL, std::string(int)>;
|
最后我们再来总结一下,pro::proxy<Dictionary>::ia_是如何继承MemAt::accessor<F, CONV_IMPL, std::string(int)>的:
类型为 details::facade_traits<Dictionary>::indirect_accessor
facade_traits<Dictionary>通过composite_accessor将Dictionary的convention列表Dictionary::convention_types转换成多继承结构,间接让indirect_accessor继承了MemAt::accessor<Dictionary, CONV_IMPL, std::string(int)>。
所以我们可以想到,一开始如果我们多调用几次add_convention,最后就要让pro::proxy<Dictionary>多继承几个accessor。
MemAt::accessor<Dictionary, CONV_IMPL, std::string(int)>的实例化长这样:
1
2
3
4
5
6
|
struct accessor<Dictionary, CONV_IMPL, std::string(int)> {
std::string at(int idx) {
return ::pro::proxy_invoke<CONV_IMPL>(::pro::access_proxy<Dictionary>(*this), idx);
}
};
|
既然我们的pro::proxy<Dictionary>::ia_间接继承到了MemAt::accessor<Dictionary, CONV_IMPL, std::string(int)>,那自然是可以调用dictionary->at(1)。
截至到目前为止,我们自动给proxy添加上了at方法。
数据存储
接下来,我们开始考虑,如何将任意满足要求的类型T,存储到proxy中,看看会保存什么东西下来。
数据存储
首先,我们再检查proxy的实现,在PrintDictionary(&container1);的前提下,P=std::map<int, std::string>*。请注意,此时P是一个指针类型:
1
2
3
4
5
6
7
8
9
10
11
12
13
14
15
16
17
18
19
20
21
22
23
24
25
26
27
28
29
30
31
| template <class F>
class proxy : public details::facade_traits<F>::direct_accessor {
using _Traits = details::facade_traits<F>;
public:
template <class P>
proxy(P&& ptr) noexcept(std::is_nothrow_constructible_v<std::decay_t<P>, P>)
{ initialize<std::decay_t<P>>(std::forward<P>(ptr)); }
private:
template <class P, class... Args>
P& initialize(Args&&... args) {
std::construct_at(reinterpret_cast<P*>(ptr_), std::forward<Args>(args)...);
meta_ = details::meta_ptr<typename _Traits::meta>{std::in_place_type<P>};
return *std::launder(reinterpret_cast<P*>(ptr_));
}
private:
[[___PRO_NO_UNIQUE_ADDRESS_ATTRIBUTE]]
typename _Traits::indirect_accessor ia_;
details::meta_ptr<typename _Traits::meta> meta_;
alignas(F::constraints.max_align) std::byte ptr_[F::constraints.max_size];
};
struct Dictionary : pro::facade_builder
::add_convention<MemAt, std::string(int)>
::build {};
|
这里F::constraints.max_size在64位的机器上是16字节。感兴趣的可以看看details::normalize的实现。16字节足以容纳指针和智能指针了。
有关于ptr_这里就没有更多的秘密了,就是存个指针。
接下来关注meta_的结构。meta信息一般情况下是用来描述一个类型的基础信息,例如要如何构造,如何析构。这里_Traits::meta比较重要的结构是存储了convention的meta信息。
首先关注_Traits::meta结构体,details::facade_traits我们是第二次分析了:
1
2
3
4
5
6
7
8
9
10
11
12
13
14
15
16
17
18
19
20
21
22
23
24
25
26
27
28
| using _Traits = details::facade_traits<F>;
struct facade_traits<F>
: instantiated_t<facade_conv_traits_impl, typename F::convention_types, F>,
instantiated_t<facade_refl_traits_impl, typename F::reflection_types, F> {
using copyability_meta = lifetime_meta_t<
copyability_meta_provider, F::constraints.copyability>;
using relocatability_meta = lifetime_meta_t<
relocatability_meta_provider,
F::constraints.copyability == constraint_level::trivial ?
constraint_level::trivial : F::constraints.relocatability>;
using destructibility_meta = lifetime_meta_t<
destructibility_meta_provider, F::constraints.destructibility>;
using meta = composite_meta<copyability_meta, relocatability_meta,
destructibility_meta, typename facade_traits::conv_meta,
typename facade_traits::refl_meta>;
static constexpr bool has_indirection = !std::is_same_v<
typename facade_traits::indirect_accessor, composite_accessor_impl<>>;
};
template <class... Ms>
using composite_meta =
recursive_reduction_t<meta_reduction_t, composite_meta_impl<>, Ms...>;
|
关于复制操作的约束级别我们目前可以不用考虑,重点关注meta。可以看到最终meta也是调用到了recursive_reduction_t,这个之前我们分析过用法,最终meta的类型类似:
1
2
3
4
5
6
7
8
| using _Traits::meta =
struct composite_meta_impl : facade_traits::conv_meta, {
constexpr composite_meta_impl() noexcept = default;
template <class P>
constexpr explicit composite_meta_impl(std::in_place_type_t<P>) noexcept
: Ms(std::in_place_type<P>)... {}
};
|
这里重点看facade_traits::conv_meta:
1
2
3
4
5
6
7
8
9
10
11
12
13
14
|
struct facade_conv_traits_impl<F, Cs...> : applicable_traits {
using conv_meta = composite_meta<typename conv_traits<Cs>::meta...>;
}
struct conv_traits<C>
: instantiated_t<conv_traits_impl, typename C::overload_types, C> {};
using facade_traits::conv_meta =
struct composite_meta_impl : conv_traits<conv_impl<false, MemAt, std::string(int)>>::meta {}
|
再回顾一下CONV_IMPL的定义:
1
2
3
| CONV_IMPL = conv_impl<false, MemAt, std::string(int)>
using facade_traits::conv_meta = struct composite_meta_impl : conv_traits<CONV_IMPL>::meta {}
|
此时展开一下conv_traits,我们需要获得conv_traits::meta:
1
2
3
4
5
6
7
8
9
10
11
12
| template <class C>
struct conv_traits<C>
: instantiated_t<conv_traits_impl, typename C::overload_types, C> {};
struct conv_traits<CONV_IMPL>
: instantiated_t<conv_traits_impl, std::tuple<std::string(int)>, CONV_IMPL>
struct conv_traits<CONV_IMPL> : conv_traits_impl<CONV_IMPL, std::string(int)>
using facade_traits::conv_meta =
struct composite_meta_impl : conv_traits_impl<CONV_IMPL, std::string(int)> {}
|
接下来看看conv_traits_impl干了什么,这里的重点还是conv_traits_impl::meta:
1
2
3
4
5
6
7
8
|
template <class C = CONV_IMPL, class... Os = std::string(int)>
struct conv_traits_impl<C, Os...> : applicable_traits {
using meta = composite_meta_impl<dispatcher_meta<typename overload_traits<Os>
::template meta_provider<C::is_direct, typename C::dispatch_type>>...>;
};
|
这里composite_meta_impl我们暂时不展开。
是在我们的case里,Os = std::string(int),因此这里的模板参数R = std::string, args = int,C = CONV_IMPL,因此C::is_direct=false, C::dispatch_type=MemAt,可以回顾一下最开始convention声明部分的讲解,展开之后得到:
1
| dispatcher_meta<overload_traits<std::string(int)> ::meta_provider<false, MemAt>>>
|
这里的先处理overload_traits<std::string(int)>::meta_provider<false, MemAt>>,它是用来提取重载函数信息的。
1
2
3
4
5
6
7
8
9
10
11
12
13
14
15
16
17
18
19
20
21
22
23
24
25
26
27
28
29
30
|
template <class R, class... Args>
struct overload_traits<R(Args...)>
: overload_traits_impl<qualifier_type::lv, false, R, Args...> {};
template <class R, class... Args>
struct overload_traits<R(Args...) noexcept>
: overload_traits_impl<qualifier_type::lv, true, R, Args...> {};
template <qualifier_type Q, bool NE, class R, class... Args>
struct overload_traits_impl : applicable_traits {
template <bool IS_DIRECT, class D>
struct meta_provider {
template <class P>
static constexpr auto get()
-> func_ptr_t<NE, R, add_qualifier_t<std::byte, Q>, Args...> {
return &indirect_conv_dispatcher<D, P, Q, R, Args...>;
}
};
struct resolver {
overload_traits_impl operator()(add_qualifier_t<std::byte, Q>, Args...);
};
};
|
这个类型总算没有继续套娃了。我们发现这里有两个比较重要的成员,meta_provider和resolver。其中,这个meta_provider十分重要,是我们之后类型擦除的重要部分。而resolver只是用来让resolver()可以返回一个overload_traits_impl,方便std::invoke_result_t获取类型罢了。
因此overload_traits<std::string(int)>::meta_provider<false, MemAt>>可以稍微转换一下得到
overload_traits_impl<qualifier_type::lv, false, std::string, int>::meta_provider<false, MemAt>,我们用MP来指代。
最后一步,我们再展开一下conv_traits_impl::meta,会得到:
1
2
3
4
5
6
7
8
9
10
11
| using conv_traits_impl::meta =
template <class MP>
struct dispatcher_meta {
constexpr dispatcher_meta() noexcept : dispatcher(nullptr) {}
template <class P>
constexpr explicit dispatcher_meta(std::in_place_type_t<P>) noexcept
: dispatcher(MP::template get<P>()) {}
decltype(MP::template get<void>()) dispatcher;
}
|
最后得到_Traits::meta的大致结构(抹掉其他继承内容):
1
2
3
4
5
6
7
| using MP = overload_traits_impl<qualifier_type::lv, false, std::string, int>::meta_provider<false, MemAt>
struct composite_meta_impl : dispatcher_meta<MP> {
constexpr composite_meta_impl() noexcept = default;
template <class P>
constexpr explicit composite_meta_impl(std::in_place_type_t<P>) noexcept
: Ms(std::in_place_type<P>)... {}
};
|
中间比较绕,代码太复杂不看没关系,重点记住这个结论就好。其实核心就是通过不停继承组合meta信息罢了。
回到proxy::meta_定义:
1
2
3
4
5
6
7
8
9
10
11
12
13
14
15
16
17
18
19
20
21
22
23
24
25
26
27
28
29
30
31
32
33
34
35
36
37
38
39
40
41
| template <class F>
class proxy {
using _Traits = details::facade_traits<F>;
private:
template <class P, class... Args>
P& initialize(Args&&... args) {
meta_ = details::meta_ptr<typename _Traits::meta>{std::in_place_type<P>};
}
private:
details::meta_ptr<typename _Traits::meta> meta_;
};
template <class M>
using meta_ptr = typename meta_ptr_traits<M>::type;
template <class M>
struct meta_ptr_traits : std::type_identity<meta_ptr_indirect_impl<M>> {};
template <class M>
struct meta_ptr_indirect_impl {
constexpr meta_ptr_indirect_impl() noexcept : ptr_(nullptr) {};
template <class P>
constexpr explicit meta_ptr_indirect_impl(std::in_place_type_t<P>) noexcept
: ptr_(&storage<P>) {}
bool has_value() const noexcept { return ptr_ != nullptr; }
void reset() noexcept { ptr_ = nullptr; }
const M* operator->() const noexcept { return ptr_; }
private:
const M* ptr_;
template <class P> static constexpr M storage{std::in_place_type<P>};
};
|
这里其实没有太多玄机,就是用数据类型,例如std::map<...>*作为初始化参数去初始化一个_Traits::meta类型的指针。
details::meta_ptr使用类型P作为初始化的参数,因此**_Traits::meta**所有父类都使用了一个P类型作为初始化参数。事实上,此时类型擦除已经完成了。
类型擦除和函数调用
类型擦除
我们回顾一下_Traits::meta继承的一个重要的类dispatcher_meta:
1
2
3
4
5
6
7
8
9
10
11
12
| using MP = overload_traits_impl<qualifier_type::lv, false, std::string, int>::meta_provider<false, MemAt>
template <class MP>
struct dispatcher_meta {
constexpr dispatcher_meta() noexcept : dispatcher(nullptr) {}
template <class P>
constexpr explicit dispatcher_meta(std::in_place_type_t<P>) noexcept
: dispatcher(MP::template get<P>()) {}
decltype(MP::template get<void>()) dispatcher;
};
|
对于PrintDictionary(&container1);,此时P = std::map<int, std::string>*已经定下来了。因此我们可以很轻松得知:
1
2
| using MP = overload_traits_impl<qualifier_type::lv, false, std::string, int>::meta_provider<false, MemAt>
dispatcher_meta<MP>::dispatcher = MP::get<std::map<int, std::string>*>
|
从之前的分析已经知道,overload_traits_impl::meta_provider::get返回的是一个函数指针,和一开始手写版的mAccessor已经是一致的了。接下来我们看看这个dispatcher是怎么用起来的。
proxy_invoke
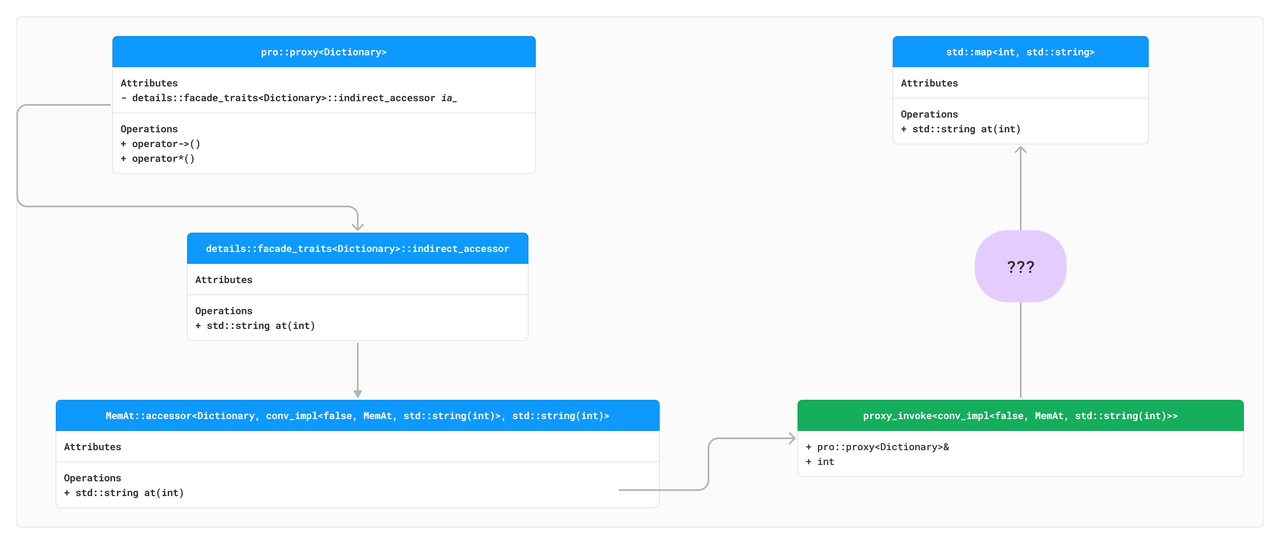
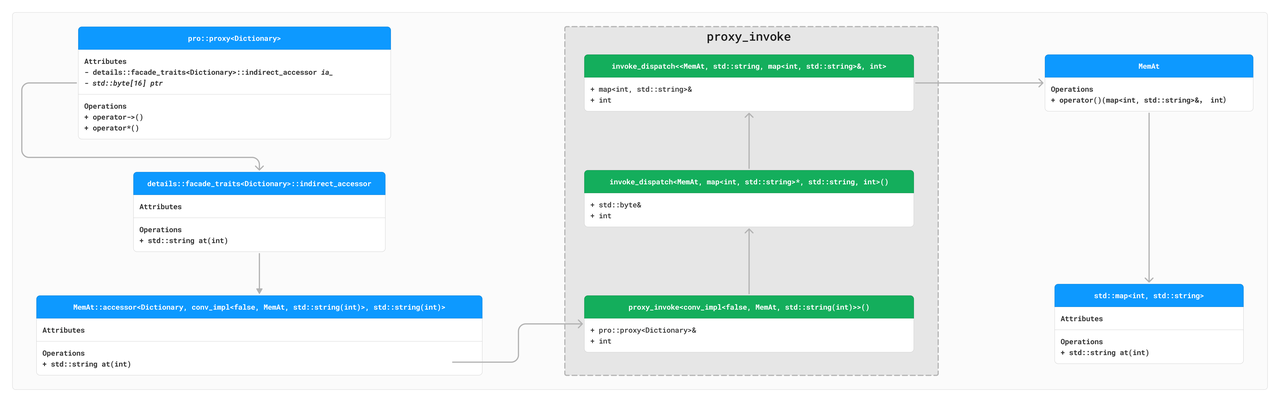
目前我们是已经知道为什么pro::proxy<Dictionary>会拥有std::string at(int)方法了(通过ia_)。接下来看看这个方法是如何和传入的结构绑定起来的。
首先从MemAt::accessor<Dictionary, CONV_IMPL, std::string(int)>::at的实现入手:
1
2
3
4
5
6
7
8
9
10
| std::string at(int idx) {
return ::pro::proxy_invoke<CONV_IMPL>(::pro::access_proxy<Dictionary>(*this), idx);
}
template <class F, class A>
proxy<F>& access_proxy(A& a) noexcept {
return details::proxy_helper<F>::template access<
A, details::qualifier_type::lv>(a);
}
|
参数部分,::pro::access_proxy<Dictionary>(*this)的目的是将this(即ia_)转换成proxy<Dictionary>,贴一下化简过的代码(通过proxy_helper::access实现):
1
2
3
4
5
6
| static proxy<Dictionary>& access(MemAt::accessor<...> &a) {
auto* ptr1 = static_cast<facade_traits<F>::indirect_accessor*>(std::addressof(a));
auto* ptr2 = reinterpret_cast<std::byte>(ptr1);
auto* ptr3 = ptr2 - offsetof(proxy<F>, ia_);
return reinterpret_cast<proxy<Dictionary>&>(*ptr3);
}
|
很好理解,就是需要通过proxy<Dictionary>::ia_获得proxy<Dictionary>的引用。因为知道成员变量的偏移量,通过指针的简单位移就能计算出来类的地址了,解指针就能获得引用了。
参数idx可以看出是完全拷贝了参数过来,截止到现在,我们知道ia_的at调用怎么又和proxy对象关联起来了,可以再补全一下图:
之后会出现挺多details::qualifier_type::_lv_之类的标识符,这里大概说明一下,这是为了配合add_qualifier_t一起使用,增加限定符用的:
1
2
3
4
| using Type1 = add_qualifier_t<int, qualifier_type::lv>;
using Type2 = add_qualifier_t<int, qualifier_type::const_lv>;
using Type3 = add_qualifier_t<int, qualifier_type::rv>;
using Type4 = add_qualifier_t<int, qualifier_type::const_rv>;
|
先看看其中一种实现(其余的实现主要是限定符的不同,思路几乎一样),这里我稍微展开了一下代码,并且带入了几个类型的特化,核心就在于proxy_helper::invoke:
1
2
3
4
5
6
7
8
9
10
11
12
13
14
15
16
17
18
19
20
21
22
23
24
25
26
27
28
29
30
31
32
33
34
|
template <class C, class F, class... Args>
decltype(auto) proxy_invoke(proxy<F>& p, Args&&... args) {
return details::proxy_helper<F>::template invoke<
C, details::qualifier_type::lv>(p, std::forward<Args>(args)...);
}
template <class F>
struct proxy_helper {
static inline const auto& get_meta(const proxy<F>& p) noexcept
{ return *p.meta_.operator->(); }
template <class C, qualifier_type Q, class... Args>
static decltype(auto) invoke(proxy<Dictionary>& p, int idx) {
using OverloadTraits = typename conv_traits<CONV_IMPL>
::template matched_overload_traits<Q, Args...>;
auto dispatcher = p.meta_->template dispatcher_meta<typename OverloadTraits
::template meta_provider<C::is_direct, typename C::dispatch_type>>
::dispatcher;
return dispatcher(std::byte&(*p.ptr_), int idx);
}
}
}
|
我们需要搞明白dispatcher里都做了什么,可以发现最终是走到了以下两个关键节点:
1
2
3
4
5
6
7
| using OverloadTraits = typename conv_traits<CONV_IMPL>
::matched_overload_traits<details::qualifier_type::lv, int>;
auto dispatcher = p.meta_->template dispatcher_meta<typename OverloadTraits
::template meta_provider<CONV_IMPL::is_direct, typename CONV_IMPL::dispatch_type>>
::dispatcher;
|
conv_traits<CONV_IMPL>的相关信息在_Traits::meta的分析里我们已经分析过了,因此最终可以得到下边的展开,请注意dispatcher_meta<MP>::dispatcher的定义
1
2
3
4
5
6
7
8
9
10
11
12
13
14
15
16
17
18
19
20
21
22
23
24
25
26
27
28
29
30
31
32
33
34
35
36
37
38
39
40
| using MP = overload_traits_impl<Q, false, std::string, int>::meta_provider<false, MemAt>
auto dispatcher = p.meta_->dispatcher_meta<MP>::dispatcher;
template <class MP>
struct dispatcher_meta {
constexpr dispatcher_meta() noexcept : dispatcher(nullptr) {}
template <class P>
constexpr explicit dispatcher_meta(std::in_place_type_t<P>) noexcept
: dispatcher(MP::template get<P>()) {}
decltype(MP::template get<void>()) dispatcher;
};
OverloadTraits =
template <qualifier_type Q, false, std::string, class... Args>
struct overload_traits_impl : applicable_traits {
template <bool IS_DIRECT, class D>
struct meta_provider {
template <class P>
static constexpr auto get()
-> func_ptr_t<NE, R, add_qualifier_t<std::byte, Q>, Args...> {
return &indirect_conv_dispatcher<D, P, Q, R, Args...>;
}
};
}
|
结合之前分析类型擦除时我们知道,当P定下来的时候,dispatcher_meta<MP>::dispatcher = MP::get<std::map<int, std::string>*>。
最终就可以知道dispatcher的类型是indirect_conv_dispatcher<MemAt, proxy<Dictionary>, details::qualifier_type::lv, std::string, int>。
带入模板参数后展开看一下indirect_conv_dispatcher,这里把ptr转成了std::map&的引用:
1
2
3
| std::string indirect_conv_dispatcher(std::byte& self, int arg) {
return invoke_dispatch(*std::map<int, std::string>*>&(&self)), arg);
}
|
发现主要调用到了invoke_dispatch,绕了一圈又回到了MemAt:
1
2
3
4
5
6
7
8
9
10
11
12
13
14
15
16
17
18
19
20
21
22
|
template <class D, class R, class... Args>
R invoke_dispatch(Args&&... args) {
if constexpr (std::is_void_v<R>) {
D{}(std::forward<Args>(args)...);
} else {
return D{}(std::forward<Args>(args)...);
}
}
struct MemAt {
template<class __T, class... __Args>
decltype(auto) operator()(__T &&__self, __Args &&...__args) noexcept(noexcept(::std::forward<__T>(__self).at(::std::forward<__Args>(__args)...)))
{
return ::std::forward<__T>(__self).at(::std::forward<__Args>(__args)...);
}
}
|
最终可以补全成这样:
总结
本文中我们分析了proxy库中convention的实现,了解了如何在编译期进行类型擦除,以及在编译期注入特定方法的方式。总结来看,我们遇到了三个类型:
MemAt,负责生成一些accessor的指令,以及最终函数调用的入口。Directory,负责组织多个convention,通过多重继承的方式使得自己拥有多个convention的方法。proxy<Directory>,根据Directory的编译信息生成meta信息,负责函数的类型擦除工作,以及原始数据的保存。
通过proxy_invoke将at方法和dispatcher返回的类型擦除的函数指针结合起来。
附加题:如何实现FreeDispatch
我们刚才讨论的是对于类方法的约束,考虑另一个问题,针对某些特定函数,我们是否可以创建一个代理,使得这个代理可以统一表示能够被特定函数接收的参数?自然是可以,如下所示:
1
2
3
4
5
6
7
8
9
10
11
12
13
| PRO_DEF_FREE_DISPATCH(CALL, std::invoke, call);
struct Callable : pro::facade_builder ::add_convention<CALL, void(int)>::build {};
void foo(int b){
std::cout << "foo! " << b << std::endl;
}
int main() {
pro::proxy<Callable> p1 = &f;
call(*p1, 1);
pro::proxy<Callable> p2 = &foo;
call(*p2, 42);
}
|
这里我们需要代理一组能够符合std::invoke调用的对象(很显然,就是lambda或者函数指针之类的)。此时使用PRO_DEF_FREE_DISPATCH来满足我们的需求。
这里本质上和成员函数的代理没什么区别,展开看一下PRO_DEF_FREE_DISPATCH:
1
2
3
4
5
6
7
8
9
10
11
12
13
| struct CALL {
template<class __T, class...__Args>
decltype(auto)
operator()(__T &&__self, __Args &&...__args)
{ return std::invoke(::std::forward<__T>(__self), ::std::forward<__Args>(__args)...); }
template<class __F, class __C, class __R, class...__Args>
struct accessor<__F, __C, __R(__Args...)> {
friend __R call(accessor &__self, __Args...__args) {
return ::pro::proxy_invoke<__C>(::pro::access_proxy<__F>(__self), ::std::forward<__Args>(__args)...);
}
};
}
|
accessor的实现略有不同,原来是在accessor中实现了一个成员函数at,现在是实现了一个友元函数call。因此继承MemAt::accessor可以有成员函数at,继承了Call::accessor则有友元函数call。
at和call的实现几乎都是一样的,通过proxy_invoke间接连接到MemAt::operator()或者Call::operator()。